Developer Guide
- Acknowledgements
- Setting up, getting started
- Design
- Documentation, logging, testing, configuration, dev-ops
- Appendix: Requirements
-
Appendix: Instructions for manual testing
- Launch and shutdown
- Adding a person
- Editing a person
- Person Synchronization in transaction list
- Deleting a person
- Adding a transaction
- Marking a transaction as done
- Reverting a done transaction back to not done
- Editing a transaction
- Filter Reuse in Transaction List
- Filtering the transaction list.
- Default Behavior on App Startup
- Saving data
- Appendix: Planned Enhancements
- Appendix: Effort
Acknowledgements
Setting up, getting started
Refer to the guide Setting up and getting started.
Design
.puml files used to create diagrams in this document docs/diagrams folder. Refer to the PlantUML Tutorial at se-edu/guides to learn how to create and edit diagrams.
Architecture
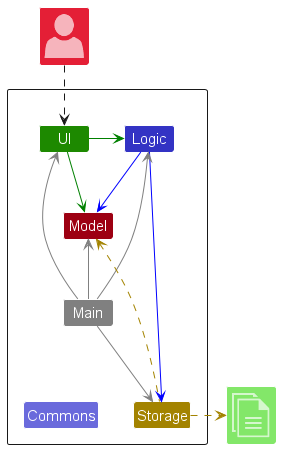
The Architecture Diagram given above explains the high-level design of the App.
Disclaimer: Our team has decided to add the
spleetwaise.commonspackage as a common package for classes that are used by multiple components, in our case,addressandtransaction. This is an enhancement for modularity on top of the original design of the AddressBook-Level3 project, which only have aseedu.addresspackage. The refactoring is almost 90% complete, and we are working on the remaining 10%.
Given below is a quick overview of main components and how they interact with each other.
Main components of the architecture
The app consists of three packages: address, transactions, and common.
-
commonis where the main application logic lives. It contains general classes that are used by multiple components in the app. -
addresscontains classes related to address book. -
transactionscontains classes related to transactions.
-
logic: Contains classes related to commands/command parsing.-
model: Contains classes for representing data in the app.-
storage: Contains classes related to reading and writing data from, and to storage.-
ui: Contains classes related to the GUI of the app.Main application
The entry-point to the app, Main (consisting of classes Main and MainApp), lives in the common package, and is in charge of managing the app’s lifecycle.
- At app launch, it initializes the other components in the correct sequence, and connects them up with each other.
- At shut down, it shuts down the other components and invokes cleanup methods where necessary.
The bulk of the app’s work is done by the following four components:
-
Ui: The UI of the App. -
Logic: The command executor. -
Model: Holds the data of the App in memory. -
Storage: Reads data from, and writes data to, the hard disk.
How the architecture components interact with each other
The Sequence Diagram below shows how the components interact with each other for the scenario where the user issues the command delete 1.
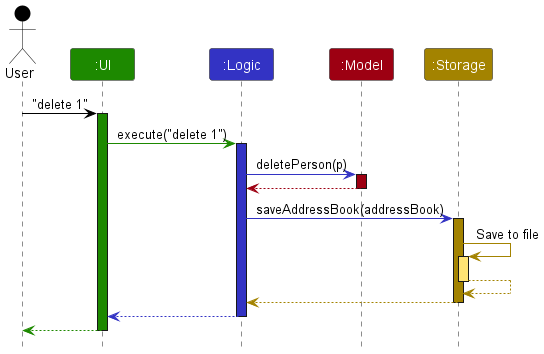
Each of the four main components (also shown in the diagram above),
- defines its API in an
interfacewith the same name as the Component. - implements its functionality using a concrete
{Component Name}Managerclass (which follows the corresponding APIinterfacementioned in the previous point.
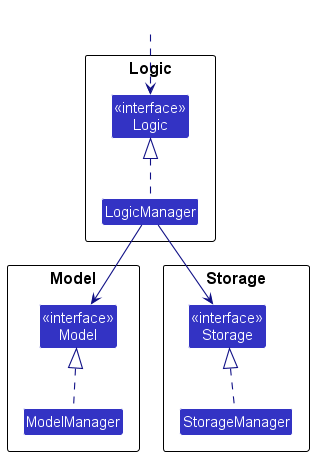
For example, the Logic component defines its API in the Logic.java interface and implements its functionality using the LogicManager.java class which follows the Logic interface. Other components interact with a given component through its interface rather than the concrete class (reason: to prevent outside component’s being coupled to the implementation of a component), as illustrated in the (partial) class diagram below.
The sections below give more details of each component.
UI component
The API of this component is specified in Ui.java
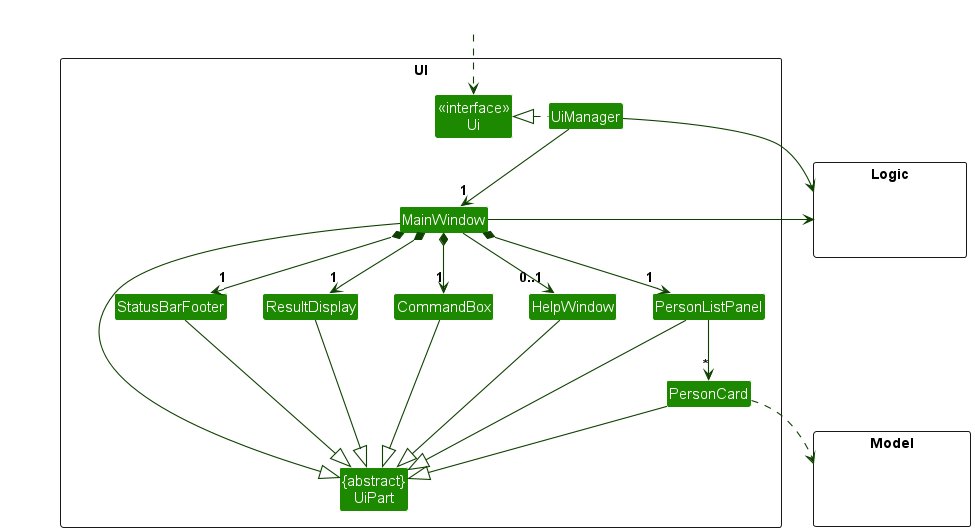
The UI consists of a MainWindow that is made up of parts e.g.CommandBox, ResultDisplay, PersonListPanel, StatusBarFooter etc. All these, including the MainWindow, inherit from the abstract UiPart class which captures the commonalities between classes that represent parts of the visible GUI.
The UI component uses the JavaFx UI framework. The layout of these UI parts are defined in matching .fxml files that are in the src/main/resources/view folder. For example, the layout of the MainWindow is specified in MainWindow.fxml
The UI component,
- executes user commands using the
Logiccomponent. - listens for changes to
Modeldata so that the UI can be updated with the modified data. - keeps a reference to the
Logiccomponent, because theUIrelies on theLogicto execute commands.
Logic component
API : Logic.java
Here’s a (partial) class diagram of the Logic component:

The sequence diagram below illustrates the interactions within the Logic component, taking execute("delete 1") API call as an example.
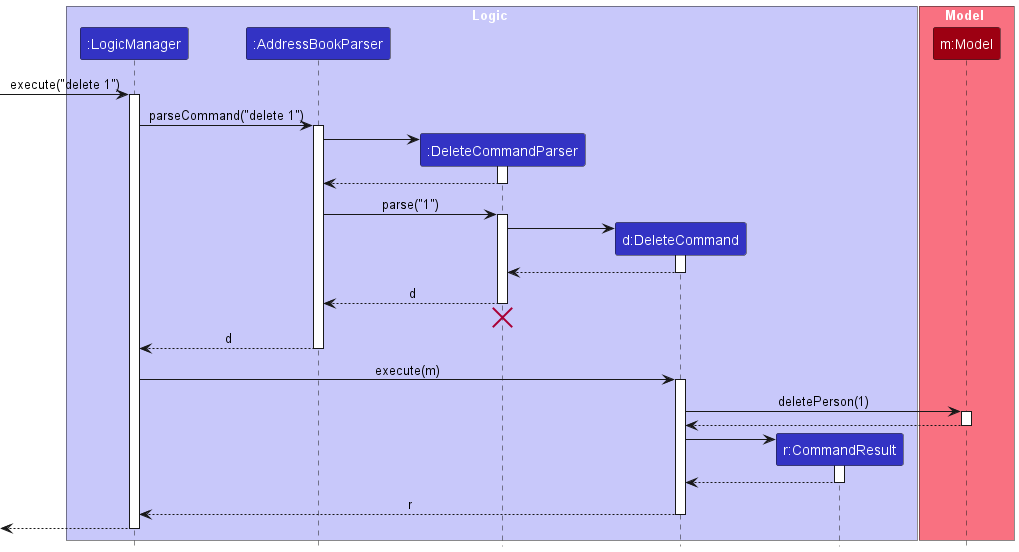
DeleteCommandParser should end at the destroy marker (X) but due to a limitation of PlantUML, the lifeline continues till the end of diagram.
Dual-parser setup
How the Logic component works:
-
When
Logicis called upon to execute a command, it will first check whether the command is known by theAddressBookParser:1.1. It is first passed to an
AddressBookParserobject which will attempt to parse it. If there is a matching command, it creates a parser that matches the command (e.g.,DeleteCommandParser) and uses it to parse the command.1.2. If there is no matching command,
Logicwill try to parse it with aTransactionParser. If there is a matching command, a similar thing happens as withAddressBookParser. The partial sequence diagram below illustrates this case clearly: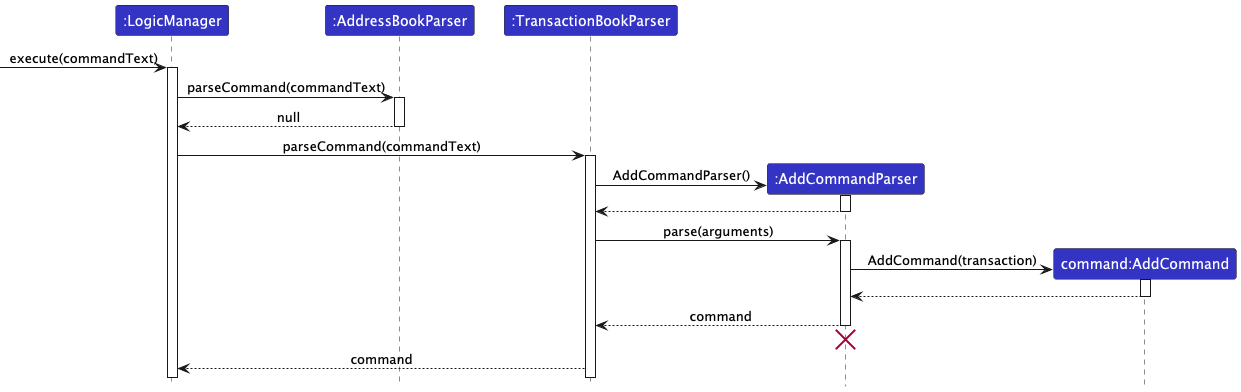
-
This ultimately results in a non-null
Commandobject (more precisely, an object of one of its subclasses e.g.,DeleteCommand) which is executed by theLogicManager. -
The command can communicate with the
Modelwhen it is executed (e.g. to delete a person).Note that although this is shown as a single step in the diagram above (for simplicity), in the code it can take several interactions (between the command object and the
Model) to achieve. -
The result of the command execution is encapsulated as a
CommandResultobject which is returned back fromLogic.
Here are the other classes in Logic (omitted from the class diagram above) that are used for parsing a user command:

How the parsing works:
-
When called upon to parse a user command, the
AddressBookParserorTransactionParserclass creates a respectiveAbCommandParser(Abis a placeholder for some specific address book command name e.g.,AddCommandParser), which uses the other classes shown above to parse the user command and create aAbCommandobject (e.g.,AddCommand) which theAddressBookParserreturns back as aCommandobject. Likewise forTransactionParserandTbCommands. -
All
AbCommandParserandTbCommandParserclasses (e.g.,AddCommandParser,DeleteCommandParser, …) inherit from a commonParserinterface so that they can be treated similarly where possible e.g, during testing.
Model component
AddressBookModel
API : AddressBookModel.java
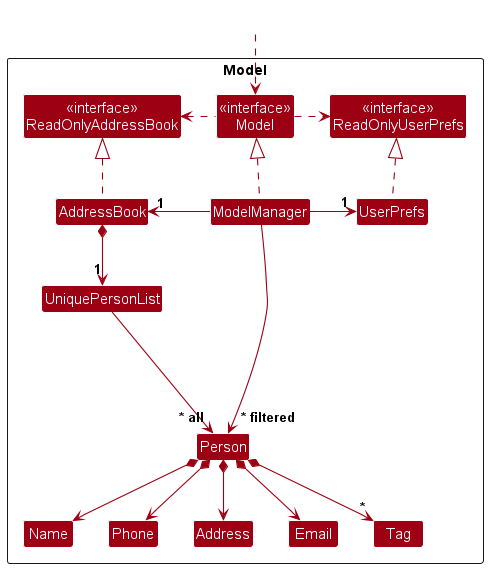
The AddressBookModel component:
- stores the address book data i.e., all
Personobjects (which are contained in aUniquePersonListobject). - stores the currently ‘selected’
Personobjects (e.g., results of a search query) as a separate filtered list which is exposed to outsiders as an unmodifiableObservableList<Person>that can be ‘observed’ e.g. the UI can be bound to this list so that the UI automatically updates when the data in the list change. - does not depend on any of the other three components (as the
Modelrepresents data entities of the domain, they should make sense on their own without depending on other components)
Tag list in the AddressBook, which Person references. This allows AddressBook to only require one Tag object per unique tag, instead of each Person needing their own Tag objects.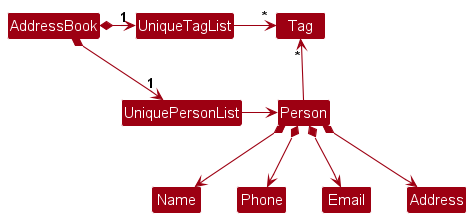
TransactionBookModel
API : TransactionBookModel.java
![]()
- stores the transaction book data i.e., all
Transactionobjects (which are contained in aObservableList<Transaction>object). - stores the currently ‘selected’
Transactionobjects (e.g., results of a search query) as a separate filtered list which is exposed to outsiders as an unmodifiableObservableList<Transaction>that can be ‘observed’ e.g. the UI can be bound to this list so that the UI automatically updates when the data in the list change. - does not depend on any of the other three components (as the
Modelrepresents data entities of the domain, they should make sense on their own without depending on other components)
CommonModel
API : CommonModel.java
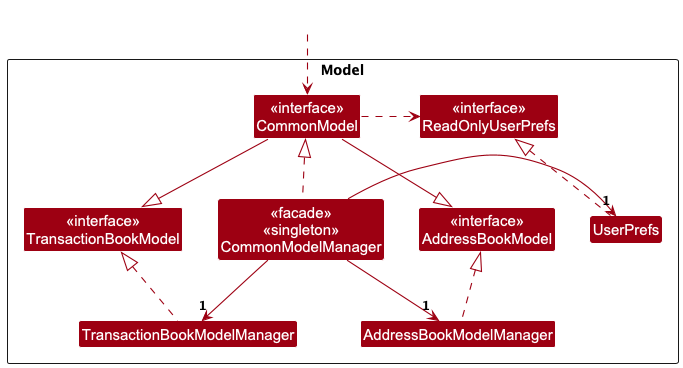
The CommonModel component:
- stores a
UserPrefobject that represents the user’s preferences. This is exposed to the outside as aReadOnlyUserPrefobjects.
CommonModelManager
Singleton CommonModel class. The singleton instance of this class contains an instance of both AddressBookModel and TransactionBookModel. The singleton instance acts as a facade, exposing the APIs of both AddressBookModel and TransactionBookModel.
Certain transaction-related features need access to data from both the address and transaction book from different areas of the codebase. For this reason, we decided to go with the CommonModelManager class design described above.
Storage component
API : Storage.java
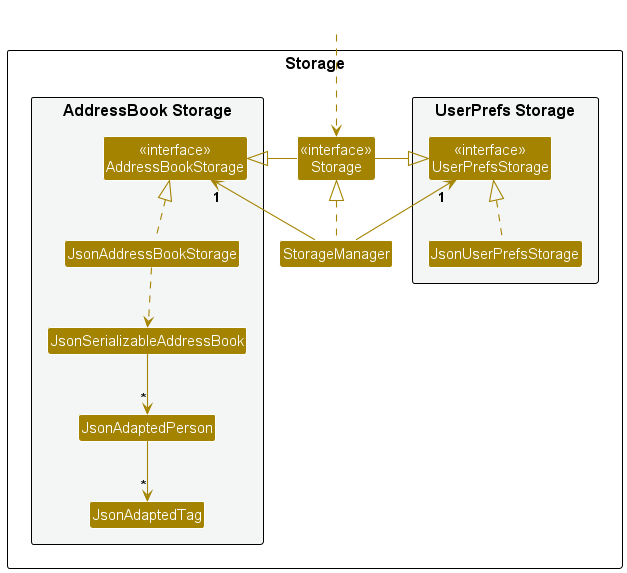
The Storage component,
- can save address book data, transaction book data and user preference data in JSON format, and read them back into corresponding objects.
- inherits from
AddressBookStorage,TransactionBookStorageandUserPrefStorage, which means it can be treated as either one (if only the functionality of only one is needed). - depends on some classes in the
Modelcomponent (because theStoragecomponent’s job is to save/retrieve objects that belong to theModel)
Documentation, logging, testing, configuration, dev-ops
Appendix: Requirements
Product scope
Target user profile: University Students in Singapore
- has a need to manage a significant number of contacts and transactions
- prefer desktop apps over other types
- can type fast
- prefers typing to mouse interactions
- is reasonably comfortable using CLI apps
- has a need to track transactions with friends and saved contacts
Value proposition: Make it easy for university students to track transactions with friends and contacts saved in the address book.
Glossary
This Spleetwaise app is a single-user application. Transactions are relative to the user.
- Mainstream OS: Windows, Linux, Unix, macOS
- Private contact detail: A contact detail that is not meant to be shared with others
-
Transaction: A Transaction represents a record of a financial interaction between the user and another party (another contact).
-
Not Done Transaction: By default, a newly created transaction is set as not done - e.g. if the transaction is added as
addTxn 1 amt/12.3 desc/John owes me for dinner, this transaction is not done, John still owes the user. (The terms “undone” and “not done” may be used interchangeably in Spleetwaise) - Done Transaction: A completed transaction, referring to the previous e.g. once John has paid the user, he will mark the transaction as done.
-
Not Done Transaction: By default, a newly created transaction is set as not done - e.g. if the transaction is added as
User stories
Priorities: High (must have) - * * *, Medium (nice to have) - * *, Low (unlikely to have) - *
| Priority | As a … | I want to … | So that I can… |
|---|---|---|---|
* * * |
new user | see usage instructions | refer to instructions when I forget how to use the App |
* * * |
user | add a new person | store the contact information of an individual that can be used in transactions |
* * * |
user | delete a person | remove entries that I no longer need |
* * * |
user | find a person by name | locate details of persons without having to go through the entire list |
* * |
user | hide private contact details | minimize chance of someone else seeing them by accident |
* |
user with many persons in the address book | sort persons by name | locate a person easily |
* * * |
user | mark and unmark expenses that are paid off/not paid | track which expenses have been settled |
* * * |
user | see how much a specific contact owes | pay them back easily |
* |
user living abroad | handle currency conversion | track expenses accurately when paying in different currencies |
* |
user who frequently travels | tag expenses by event | manage and track costs associated with specific activities or trips |
* * * |
user | view a summary of all expenses and balances | quickly see who owes what and who has overpaid |
* |
student tight on budget | set limits on certain categories | better manage my spendings |
* * |
user | access frequently contacted people quickly | record a transaction in a short amount of time |
* * |
user | create templates | add transactions quicker |
* |
user | set up recurring transactions | automate my transactions |
* * * |
student | display summary of all transaction | tabulate total amount owed or owe for personal tracking |
* * |
user | detect duplicate expenses | avoid accidentally double-tracking a payment |
* * |
student managing multiple categories | tag transactions by category | organize and search for them easily later |
Use cases
(For all use cases below, the System is SpleetWaise and the Actor is the user, unless specified otherwise)
UC01 - View Usage Instructions
Actor: New User
MSS
- The new user clicks on “Help” in the top bar of the application.
- The system displays usage instructions in a browser.
- The user reviews the instructions.
Use case ends.
Extensions
- 2a. The user can switch between different sections of the instructions (e.g., FAQs, How-to sections).
UC02 - Add a New Person
MSS
- The user requests to add a new person with the required details.
- The system validates the input.
- The system saves the new person to the address book and displays a success message.
- The new person is added to the displayed address book list.
Use case ends.
Extensions
-
2a. The system detects invalid input(s).
- 2a1. The system shows an error message.
Use case restarts from step 1.
- 2a1. The system shows an error message.
UC03 - List All People
MSS
- The user requests to list all people.
- The system displays the list of all people in the address book.
Use case ends.
UC04 - Edit Details of a Person
MSS
- The user requests to list all people (UC03) or find a person (UC06).
- The user selects a person to edit and provides new details.
- The system validates the input.
- The system updates the person with the new details and displays a success message.
- The edited person is updated and displayed in the address book.
Use case ends.
Extensions
-
1a. The address book is empty.
Use case ends.
UC05 - Delete a Person
MSS
- The user requests to list all people (UC03) or find a person (UC06).
- The user requests to delete a specific person.
- The system deletes the person.
Use case ends.
Extensions
-
1a. The address book is empty.
Use case ends.
UC06 - Find Person(s)
MSS
- The user requests to search for a person by specific detail(s).
- The system performs a search and displays all matching people.
Use case ends.
Extensions
-
2a. The system finds no matches.
- 2a1. The system displays an empty address book list.
Use case ends.
- 2a1. The system displays an empty address book list.
-
2b. The system finds multiple people and displays them in the address book list.
Use case ends.
UC07 - Add a New Transaction
MSS
- The user requests to list all people (UC03) or find a person (UC06).
- The user selects a person to add the new transaction with and inputs the required details (e.g., amount, date, description).
- The system validates the input.
- The system saves the new transaction in the transaction book and displays a success message.
- The new transaction is added to the displayed transaction book.
Use case ends.
Extensions
-
2a. The system detects invalid input(s).
- 2a1. The system shows an error message.
Use case restarts from step 1.
- 2a1. The system shows an error message.
-
4a. The system detects a duplicate transaction.
- 4a1. The system discards the duplicate and displays an error message.
Use case ends.
- 4a1. The system discards the duplicate and displays an error message.
UC08 - List All Transactions
MSS
- The user requests to list all transactions.
- The system resets the displayed transaction book.
- The system displays all transactions.
Use case ends.
UC09 - Edit a Transaction
MSS
- The user requests to list all transactions (UC08) or filter transactions (UC12).
- The user selects a transaction to edit and provides new details.
- The system validates the input.
- The system updates the transaction with the new details and displays a success message.
- The edited transaction is updated and displayed in the transaction book.
Use case ends.
Extensions
-
1a. The transaction book is empty.
Use case ends. -
3a. The system detects invalid input(s).
- 3a1. The system shows an error message.
Use case resumes from step 2.
- 3a1. The system shows an error message.
UC10 - Delete a Transaction
MSS
- The user requests to list all transactions (UC08) or filter transaction(s) (UC12).
- The user selects a specific transaction to delete.
- The system deletes the transaction.
Use case ends.
Extensions
-
2a. The transaction book is empty.
Use case ends.
UC11 - Mark Transaction(s) as Done or Not Done
MSS
- The user requests to list all transactions (UC08) or filter transaction(s) (UC12).
- The user selects a specific transaction to mark as done or not done.
- The system updates the transaction’s status.
- The system displays a success message indicating the status change.
Use case ends.
UC12 - Filter Transaction(s)
MSS
- The user requests to filter transaction(s) by specific detail(s).
- The system performs a search and displays all transactions with matching details.
Use case ends.
Extensions
-
2a. The system finds no matches.
- 2a1. The system displays an empty transaction list.
Use case ends.
- 2a1. The system displays an empty transaction list.
Non-Functional Requirements
- Should work on any mainstream OS as long as it has Java
17or above installed. - Should be able to hold up to 1000 persons without a noticeable sluggishness in performance for typical usage.
- A user with above average typing speed for regular English text (i.e. not code, not system admin commands) should be able to accomplish most of the tasks faster using commands than using the mouse.
- There should be only one type of currency used in all transactions for MVP, defaulted to SGD.
- The product supports expense tracking and consolidation, no real world exchange of money will be carried out.
- The user should be able to restore and use a backup save file as part of disaster recovery.
- The user should be able to save the save file on a portable device and continue to work on the save file on another computer.
Appendix: Instructions for manual testing
Given below are instructions to test the app manually.
Launch and shutdown
-
Initial launch
-
Download the jar file and copy into an empty folder
-
Launch the app
Expected: Shows the GUI with a set of sample contacts. The window size may not be optimum.
-
-
Saving window preferences
-
Resize the window to an optimum size. Move the window to a different location. Close the window.
-
Re-launch the app
Expected: The most recent window size and location is retained.
-
Adding a person
-
Adding a person while all persons are being shown
-
Prerequisites: List all persons using the list command. Multiple persons in the list.
-
Test case:
add n/John Doe p/98765432 e/johnd@example.com a/John street, block 123, #01-01
Expected: Assuming no duplicates, a new contact named John Doe is added to the list. Details of the added contact shown in the status message. -
Test cases:
add n/John Doe p/98765432 e/johnd@example.com a/John street, block 123, #01-01when John Doe with phone 98765432 already exists in the address book
Expected: No person is added. Error details shown in the status message withThis person already exists in the address book. Status bar remains the same. -
Test case:
add n/ p/ e/ a/
Expected: No person is added. Error details shown in the status message. Status bar remains the same. -
Other incorrect add commands to try:
add n/John Doe,add p/98765432,add e/johnd@example.com,add a/John street, block 123, #01-01
Expected: Similar to previous.
-
Editing a person
-
Editing a person while all persons are being shown
-
Prerequisites: List all persons using the
listcommand. Multiple persons in the list. -
Test case:
edit 1 n/Jane Doe
Expected: Assuming no duplicates, first contact’s name is changed to Jane Doe. Details of the edited contact shown in the status message. -
Test case:
edit 0 n/Jane Doe
Expected: No person is edited. Error details shown in the status message. -
Other incorrect edit commands to try:
edit,edit x n/Jane Doe(where x is larger than the list size),edit 1
Expected: Similar to previous.
-
Person Synchronization in transaction list
-
Ensuring person details changed are accurately reflected in all views and models.
-
Prerequisites: List all persons and transactions using the
listandlistTxncommand. At least one person and one transaction with that person in the list. -
Test case:
edit 1 n/New Name(whereNew Nameis the updated name for the person)
Expected: The person’s name updates in both the address and transaction lists and the UI (assuming no duplicates).
-
Deleting a person
-
Deleting a person while all persons are being shown
-
Prerequisites: List all persons using the
listcommand. Multiple persons in the list. -
Test case:
delete 1
Expected: First contact is deleted from the list. Details of the deleted contact shown in the status message. -
Test case:
delete 0
Expected: No person is deleted. Error details shown in the status message. -
Other incorrect delete commands to try:
delete,delete x,...(where x is larger than the list size)
Expected: Similar to previous.
-
Adding a transaction
-
Adding a transaction while all transactions are being shown with minimally 1 person in address book
-
Prerequisites: List all persons and transactions using the
listandlistTxncommand. At least one person in the address book list and multiple transactions in the list -
Test cases:
addTxn 1 amt/12.3 desc/John owes me for dinner
Expected: Assuming no duplicates, a new transaction related to the person in the first index of the address book is added to the list along with description of it. The amount reflected in the transaction is displayed green in the transaction panel to signify that the user is owed. The date of the transaction displays the current day. No categories to be displayed. Details of the added transaction is shown in the status message. -
Test cases:
addTxn 1 amt/-12.3 desc/I owe John for dinner date/10102024
Expected: Assuming no duplicates, a new transaction related to the person in the first index of the address book is added to the list along with description of it. The amount reflected in the transaction is displayed red in the transaction panel to signify that the user owes. The date of the transaction displays10 Oct 2024. No categories to be displayed. Details of the added transaction is shown in the status message. -
Test cases:
addTxn 1 amt/12.3 desc/John owes me for dinner cat/FOOD
Expected: Assuming no duplicates, a new transaction related to the person in the first index of the address book is added to the list along with description of it. The amount reflected in the transaction is displayed green in the transaction panel to signify that you are owed. The date of the transaction displays the current day. Category ofFOODis displayed. Details of the added transaction is shown in the status message. -
Test cases:
addTxn 1 amt/-12.3 desc/I owe John for dinner date/10102024when identical transaction exists
Expected: No transaction is added. Error details shown in the status message withTransaction already exists in the transaction book. Status bar remains the same. -
Test cases:
addTxn 0 amt/ desc/ date/ cat/
Expected: No transaction is added. Error details shown in the status message. Status bar remains the same. -
Other incorrect
addTxncommands to try:addTxn 1,addTxn amt/1.234,addTxn desc/dinner,addTxn date/10102024,addTxn cat/FOOD
Expected: Similar to previous.
-
Marking a transaction as done
-
Marking a transaction as done while all transactions are being shown.
-
Prerequisites: List all transactions using the
listTxncommand. One transaction is in the list. -
Test cases:
markDone 1
Expected: The first transaction is marked as done. A “done” icon appears next to the person’s name for that transaction. Details of the updated transaction shown in the status message. -
Test cases:
markDone 1(Assumes transaction 1 is already marked)
Expected: No change in transaction status. The “done” icon remains. A status message confirms that the transaction is already marked. -
Test cases:
markDone 0
Expected: No transaction is marked. Error details shown in the status message. -
Other incorrect
markDonecommands to try:markDone,markDone x(where x is larger than the list size)
Expected: Similar to previous.
-
Reverting a done transaction back to not done
-
Reverting a done transaction back to not done while all transactions are being shown.
-
Prerequisites: List all transactions using the
listTxncommand. One transaction is in the list. -
Test cases:
markUndone 1
Expected: The first transaction is reverted to not done. The existing “done” icon disappears for that transaction. Details of the updated transaction shown in the status message. -
Test cases:
markUndone 1(Assumes transaction 1 is already undone)
Expected: No change in transaction status. The transaction remains to have no “done” icon. A status message confirms that the transaction is already undone. -
Test cases:
markUndone 0
Expected: No transaction is marked. Error details shown in the status message. -
Other incorrect
markUndonecommands to try:markUndone,markUndone x(where x is larger than the list size)
Expected: Similar to previous.
-
Editing a transaction
-
Editing a transaction while all persons are being shown
-
Prerequisites: List all persons and transactions using the
listandlistTxncommand respectively. Multiple persons in the list on the left pane. Multiple transactions in the list on the right pane. -
Test case:
editTxn 1 amt/1.23
Expected: Assuming no duplicates, first contact’s amount is changed to $1.23. Details of the edited transaction shown in the status message. -
Test case:
editTxn 0 desc/Updated description
Expected: No transaction is edited. Error details shown in the status message. -
Other incorrect edit commands to try:
editTxn,edit x amt/1.23(where x is larger than the list size),editTxn 1
Expected: Similar to previous.
-
Filter Reuse in Transaction List
-
Maintaining the current filter state when transactions are modified.
-
Prerequisites: List all transactions using the
listTxncommand. Apply a filter viafilterTxncommand to the list (e.g., filtering by description containing “mac”). -
Test cases:
addTxn 1 amt/12.3 desc/John owes me for dinner
Expected: The new transaction appears in the filtered list while preserving the existing filter. Details of the new transaction shown in the status message. -
Test cases:
editTxn 1 d/happy meal at mac(Assumes transaction 1 description is “KFC”)
Expected: The updated transaction appears in the filtered list while preserving the existing filter. Details of the updated transaction shown in the status message. -
Test cases:
editTxn 1 d/KFC(Assumes transaction 1 description is “fries at mac”)
Expected: The updated transaction disappears in the filtered list while preserving the existing filter. Details of the updated transaction shown in the status message. -
Test cases:
markDone 1,markUndone 1(Assumes transaction 1 description is “fries at mac”)
Expected: The transaction done icon updated in the filtered list while preserving the existing filter. Details of the updated transaction shown in the status message.
-
Filtering the transaction list.
-
Filtering the transaction list while all persons are being shown
-
Prerequisites: List all persons and transactions using the
listandlistTxncommand respectively. Multiple persons in the list on the left pane. Multiple transactions in the list on the right pane. -
Test case:
filterTxn 1
Expected: Transaction list will be filtered by the person corresponding to the displayed index 1 in the person list. -
Test case:
filterTxn 1 amt/1.23
Expected: Transaction list will show transactions related to the person corresponding to the displayed index 1 in the person list with amount $1.23. -
Test case:
filterTxn 0
Expected: Current displayed transaction list will remain the same. Error details shown in the status message. -
Other incorrect edit commands to try:
filterTxn desc/,filterTxn x(where x is larger than the list size),filterTxn amt/1.222
Expected: Similar to previous.
-
Default Behavior on App Startup
-
Verifying filter state of transaction panel upon app initialization.
-
Prerequisites: At least one done transaction and one undone transaction in the list.
-
Test cases: Initial Filter on App Startup
Expected: The list displays all transactions (both done and not done) by default when the app starts.
-
Saving data
-
Dealing with missing/corrupted data files
-
Prerequisites: Multiple persons in
addressbook.jsonand multiple transactions intransactionbook.jsondata files. -
Test cases: Missing
namefield inaddressbook.jsondata file
Simulation: Remove thenamefield from a person entry in the JSON file, then start the app.
Expected: The person is discarded and not loaded to the app, with log messageWARNING: Address book is possibly corrupted: Person's Name field is missing! Ignoring corrupted person.. If the corrupted person has any related transactions in the transaction book, they will be discarded accordingly with log messageWARNING: Transaction book is possibly corrupted: Person with id [Person-ID] not found! Ignoring corrupted transactions.-[Person-ID]will be the respective person ID of the corrupted person. -
Test cases: Missing
isDonefield intransactionbook.jsondata file
Simulation: Remove theisDonefield from a transaction entry in the JSON file, then start the app.
Expected: The transaction loads as not done by default. Upon closing the app, the transaction is saved as not done in the JSON file.
-
Appendix: Planned Enhancements
Team Size: 5
-
Enhancements for Tracking “Not Done” Balances
Currently, users can calculate all balances that are “Not Done” viafilterTxn status/Not Done. However, this doesn’t provide the option to display a filtered transactions list that includes completed transactions while only showing the balance for “Not Done” transactions. Additionally, introducing a command likeshowBalance status/Not Donewould give users a streamlined way to view balances for only “Not Done” transactions, regardless of the state of the filtered list. This command would allow users to easily toggle between viewing total balances and those specifically marked as “Not Done.” -
Case-Insensitive Duplicate Detection for Person
SpleetWaise currently treats names as case-sensitive, so persons with names like “bob” and “Bob” are stored as distinct entries, even with the same phone number. This can lead to duplicate entries if capitalisation is inconsistent (e.g., “Alex Yeoh” vs. “alex yeoh”). Future updates aim to handle fields likenames,emails,tagsandremarksin a case-insensitive manner, treating persons with identical names with matching phone numbers as potential duplicates and alerting the user to confirm or discard the entries. -
Case-Insensitive Duplicate Detection for Transaction
Currently, transaction withaddTxn 1 amt/12 desc/ntuc fairpriceandaddTxn 1 amt/12 desc/NTUC FAIRPRICEis allowed without a warning/confirmation/alert to users even though it could be a potential duplicate (notice that the description in both the commands are treated as different). We aim to implement case-insensitive matching for thedescriptionfield to detect potential duplicates of transaction and prompt users to confirm or discard duplicate entries. -
Improve
findCommand for Partial Matching Across Parameters
Allowfindcommand to search for persons through more fields and implement partial matches fornames,phone numbers,emails,addresses,remarks, andtags. This makes it easier for users to locate contacts even if they don’t have exact matches. -
Enhance
filterTxnCommand for Partial Matching Across Parameters
Implement partial matching infilterTxnfor parameters likeamount,person,date(day, month, year),status, andcategory, enabling users to search transactions with related keywords without exact matches. -
International Phone Number Format Support
Update phone number validation to accept international formats, including country codes and special characters (e.g., “+”, “-“). This allows users to store numbers in formats like “+65 91234567” or “+1-123-456-7890”. -
Flexible Input Validation for Tags
Allow special characters in tags, enabling users to create tags such as “#Business_Partner” or “Friends & Family” for better organization. -
Flexible Input Validation for Categories
Allow special characters in categories, enabling users to create categories such as “#Business_Trip” or “Food & Beverage” for better organization. -
Enhanced Email Validation for Full Domain Structure
Enforce email validation to require a fully qualified domain (e.g., “username@example.com”) to prevent invalid formats, ensuring more reliable email entries. -
Improve Duplicate Transaction Error Message
Provide detailed information in duplicate transaction error messages, specifying duplicate fields (e.g., description, date, and amount) to help users resolve conflicts faster.
These enhancements address search functionality, error handling, input validation, duplicate detection, and user interface improvements, collectively enhancing SpleetWaise’s usability and functionality.
Appendix: Effort
Difficulty Level
Compared to iP (rated 10/20), this project rates at 17/20 due to:
- 2 points for comprehensive UG and DG documentation, providing detailed explanations of each feature, use case, and design decision.
- 2 points for extensive refactoring in a large codebase. Approximately 17,000 lines of code were added/modified to improve modularity and maintainability through reusable components, simplifying development in later stages.
- 2 points for implementing complex validation and equality checks. Significant effort was spent on robust validation across various input fields, handling edge cases thoroughly.
- 1 point for collaborative development and effective Git workflows, including pull requests, reviews, and conflict resolution.
Additional Complexity in Transaction Features
Much more effort was spent on implementing transaction features in SpleetWaise compared to the AB3 features.
One example is the find command in AB3 vs. filterTxn in SpleetWaise. In AB3, find only filters by name using a single NameContainsKeywordsPredicate class. In SpleetWaise, filterTxn filters transactions by multiple parameters (e.g., description, amount, status, person) in any combination. This required a modular FilterPredicate system, resulting in seven *FilterPredicate classes and a FilterCommandPredicate wrapper, each with its own test cases. This approach reduced code complexity and duplication by reusing FilterPredicate classes in the UI.
Achievements of the Project
- Feature Implementation: Delivered core transaction management features, including filtering and searching.
- Comprehensive Documentation: UG and DG support long-term use and maintenance.
- Modular Codebase with High Test Coverage: Achieved a modular structure with over 90% code coverage for core functionalities, reducing technical debt.